Patch repairs
Render Repairs Sheffield: Patching Cracked and Hollow Render
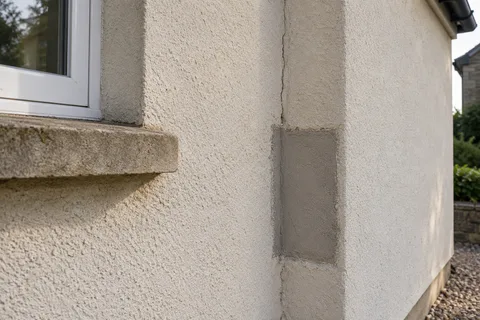
A render repair replaces a damaged area and keeps everything around it. Typical repairs are a hollow patch that has started to bulge, a crack running from the corner of a window, a corner knocked off by a car or a ladder, a crumbling strip along the bottom of a wall, and the mess left when a satellite dish or burglar alarm comes off. Most are small, but each one has to be cut out to sound render and rebuilt in the right coats.

On this page
Finding how far the damage goes
What you can see is rarely the whole repair. Render that has lost its grip on the wall can look intact until it is tapped. Writing on lime render repairs, the Building Conservation Directory describes light taps with the back of the hand or a chisel to locate loose render, map how far it runs, and judge whether it has separated from the wall or from the coat below. A bulge or a crack is often the visible sign of a larger hollow area behind it.
Tapping at height belongs to whoever is doing the repair, from proper access. From the ground you can usefully note where cracks start, which way they run, whether they are growing, and whether a gutter, downpipe or sill is putting water onto that spot.
Cracks have different causes. K Rend sorts cracks into four kinds, structural, settlement or shrinkage, stress cracks at window and door corners, and fine surface crazing, and its advice is to pin down why a crack formed and usually to give it time to stabilise before filling it. If it is still widening, a patch will simply crack again.
- Map the damage Tapping finds hollow areas; cracks and their likely cause are noted.
- Cut back Failed render is cut out to a sound edge, usually squared off.
- Fix the cause Leaking gutters, sills without drips or render below the DPC are dealt with.
- Rebuild in coats Using a material compatible with the surrounding render and masonry.
- Blend the finish Texture is matched; colour may need a coating over the wider area.
The usual order of work. The survey and the chosen products decide the actual steps.
How a patch is cut out and rebuilt
The repairer marks the hollow area, then cuts the render back beyond it until the edge sounds solid all the way round. Loose material comes away from the exposed brick or block, crumbling joints are raked out and repointed, and dust is brushed off. The background is then dampened or primed so it does not suck water out of the new render too fast; K Rend's product guide lists a bonding aid for high-suction backgrounds such as lightweight block and an acrylic primer where key is poor.
The new render is built up in coats to the same total thickness as the old, so the patch finishes flush. Where the crack starts at the corner of an opening, the repair is reinforced with glass-fibre mesh in the first coat, the stress-point treatment K Rend's guide describes. The final coat is worked to match the texture around it, whether that is a scraped monocouche, a rubbed silicone grain or a floated sand-and-cement surface ready for paint.
Not every crack needs cutting out. Hairline cracks and small holes in render that is otherwise firm need only filling, and K Rend's Colour Fill is a tinted, ready-to-use exterior filler made for that.
Find the cause and fix it: gutter, downpipe, sill or a bracket letting water in.
Tap round the damage and mark the hollow area with a margin to sound render.
Cut back to a firm edge, clean the masonry and repair loose joints.
Dampen or prime the background to control suction.
Rebuild the coats to the original thickness, with mesh at window and door corners.
Finish to match the surrounding texture, then protect from rain and frost while it cures.
Making a patch disappear, or not
A patch can be technically perfect and still visible. New render is cleaner than weathered render, and a few square metres of fresh colour in an old wall stands out until it has aged. Texture matters as much as colour: a patch scraped at a different moment, or floated instead of scraped, catches the light differently. Matching is easier at a natural break, such as a corner, a window line or a downpipe.
If the wall must look uniform, the usual answer is a coating over the whole face once the repair has cured; the respray page explains it. On a lime-rendered wall, a limewash over the repair and the wall around it does the same job, and SPAB recommends limewash rather than modern paint on old lime work.
When a repair becomes a re-render
Patching makes sense while most of the wall is sound. When the loose areas link up across most of the face, or older patches are coming away round their edges, stop patching and re-render that elevation; see re-rendering a single wall. Approved Document L also draws a line here: a new render layer is renovation, and covering more than half of an elevation can require its insulation to be improved where feasible, although a small patch must also be considered alongside any wider renovation.
Common questions
Can a crack just be filled?
A fine crack in sound render can be filled with a suitable exterior filler. A crack with hollow render around it, or one that is still widening, needs its cause found and the area cut out and rebuilt.
Why does my repair stand out?
Fresh render differs from weathered render in colour and often in texture. It usually tones down with time; a coating over the whole wall is the way to make it uniform straight away.
See housing and planning information for Sheffield and nearby places, including the source and geography behind each figure.